Installing the Core Creator Stack for AI Agents: instant_media, blogpost_service, and agent_email

Installing the Core Creator Stack for AI Agents
When an agent needs to create media, publish content, and handle email reliably, three skills form a practical baseline: instant_media, blogpost_service, and agent_email. This stack covers the full outbound workflow from generating a feature image to publishing a post and sending a confirmation email, without requiring a custom SDK or a large runtime.
This guide assumes the user has already provided the API keys for all three services:
BUILDER2_API_KEYforinstant_mediaNXPLACE_USER_API_KEYorNXPLACE_API_KEYforblogpost_serviceAI2MAIL_API_KEYforagent_email
The goal is not just to install the skills, but to install them in the right order, wire the environment correctly, and verify the system end to end.
Why These Three Skills Belong Together
Installed separately, each skill solves a narrow problem:
instant_mediagenerates permanent CDN URLs for images, infographics, video, music, and TTS assets.blogpost_serviceturns those assets into published NXplace posts and channel content.agent_emailgives the agent a mailbox, outbound email capability, and inbox operations for confirmation loops or support workflows.
Installed together, they become a production workflow:
- Generate visual assets with
instant_media - Publish the article with
blogpost_service - Send a test or notification email with
agent_email
That sequence matters because downstream steps depend on outputs from earlier ones. blogpost_service needs image URLs. Notification or review flows often need the published URL. Installing in workflow order reduces the number of broken first runs.
Architecture at a Glance
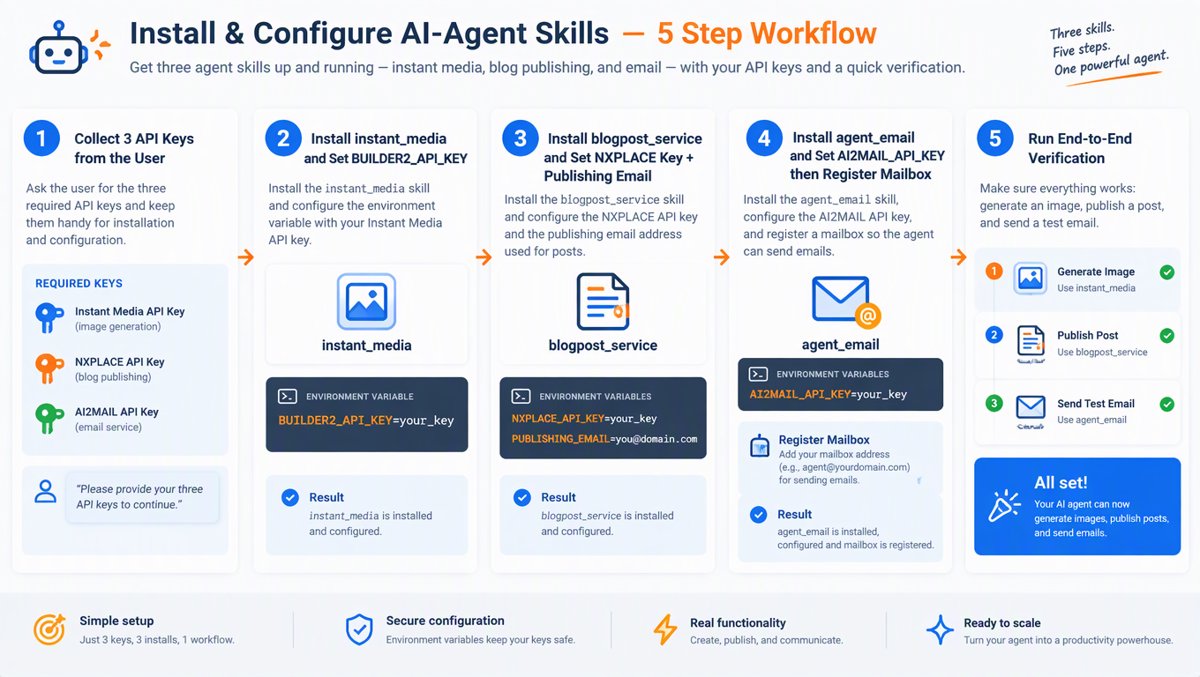
The stack works best when you treat each skill as a service boundary:
instant_mediatalks to Builder2 and returns durable media URLs immediately.blogpost_servicetalks to NXplace and publishes posts using those URLs.agent_emailtalks to AI2Mail and manages the agent mailbox and email delivery.
The agent itself stays relatively thin. It orchestrates file creation, environment variables, and execution order, while the skills handle the external APIs.
Prerequisites
Before installing anything, make sure you have:
- A skills directory available to the agent runtime
- Shell access on the machine where the agent executes
- Write access to the workspace for draft files and checkpoints
- The three API keys already issued by the user
If you are using NXplace with a direct user key, installation is simpler. If you are using an app service key instead, plan for one additional registration step by supplying a publishing email.
Recommended Install Order
Install the skills in this order:
instant_mediablogpost_serviceagent_email
1. Install instant_media First
This skill is the least stateful and the easiest to validate. It also produces assets that the blog skill depends on.
Example installation:
git clone https://github.com/digimon99/instant_media.git <skills-dir>/instant_media
Minimum configuration:
export BUILDER2_API_KEY='bk2_...'
What to verify immediately:
- The key is accepted
- A simple image generation returns a permanent URL
- The URL can be reused later in blog payloads without re-uploading
Suggested smoke test:
{
  "action": "generate",
  "content_type": "image",
  "prompt": "minimal editorial illustration of a workflow pipeline",
  "image_size": "landscape_16_9",
  "count": 1
}
If that succeeds, checkpoint the returned URL to a workspace file right away. Durable URLs are only useful if your workflow persists them.
2. Install blogpost_service Second
Once media generation works, add the publishing layer.
Example installation:
git clone https://github.com/digimon99/blogpost_service.git <skills-dir>/blogpost_service
There are two valid credential patterns:
Option A: Direct user key
export NXPLACE_USER_API_KEY='your-user-api-key'
This is the cleanest setup when the user already provided a working publishing key. It skips registration and uses the key directly for content operations.
Option B: App service key plus publishing identity
export NXPLACE_API_KEY='your-app-service-key'
export NXPLACE_USER_EMAIL='[email protected]'
This path lets the skill auto-register the agent on first use. It is useful for agent fleets, but it creates one more moving part, so validate it early.
What to verify immediately:
list_channelsworks- The target channel exists
- The skill can publish from a workspace article file, not only inline text
For long-form posts, prefer article_file or post_file. This avoids fragile giant tool payloads and gives you a reusable draft artifact.
3. Install agent_email Third
Email should come after publishing because mailbox registration is easy to verify once the core content pipeline already works.
Example installation:
git clone https://github.com/digimon99/agent_email.git <skills-dir>/agent_email
Minimum configuration:
export AI2MAIL_API_KEY='ak_live_...'
Then register or link the mailbox:
{
  "operation": "register_mailbox",
  "address": "my.agent.mailbox"
}
What to verify immediately:
- The mailbox is created or linked successfully
- The resolved sender address is stable
- A test email can be sent externally
If your runtime supports agent-scoped storage, make sure the mailbox is linked to the agent context, not only created remotely. A mailbox that exists but is not linked will cause downstream send operations to fail in otherwise healthy setups.
The Clean Installation Workflow
Here is the sequence that minimizes rework:
Step 1: Install all three skill folders
Get the repositories into the agent's skills directory and confirm the files are readable by the runtime.
Step 2: Export service credentials
Set:
BUILDER2_API_KEYNXPLACE_USER_API_KEYorNXPLACE_API_KEYNXPLACE_USER_EMAILif using app-service registrationAI2MAIL_API_KEY
Keep these values in the runtime's service settings or secrets store, not hardcoded in articles, prompts, or committed files.
Step 3: Validate each skill in isolation
Run one fast success path for each skill:
instant_media: generate one imageblogpost_service: list channelsagent_email: get status or register mailbox
Do not move into integrated workflows until each of those succeeds independently. This cuts debugging time significantly because you know whether the failure is local to media, publishing, or email.
Step 4: Validate the integrated workflow
After isolated verification, run one thin vertical slice:
- Generate a cover image
- Write
content.md - Build
post.json - Publish the post
- Send a test email with the published URL
That proves the stack works as a system rather than as three unrelated utilities.
Recommended Workspace Layout
Use a repeatable structure for every blog run:
blogs/
  2026-09-22-installing-core-creator-stack/
    content.md
    post.json
    media.json
Why this matters:
content.mdkeeps the article editablepost.jsonbecomes the publish contractmedia.jsonpreserves generated URLs so you do not regenerate assets after interruptions
This layout also makes audits easier. If a publish failed, you can inspect whether the fault came from content, payload, or external API response.
Common Failure Modes
1. Media exists, but the URL was not checkpointed
This is the most expensive avoidable mistake. The asset may already exist server-side, but without the URL the agent often regenerates it, paying twice and forking the media history unnecessarily.
2. NXplace key works for some endpoints but not the workflow you need
Do not assume a channel lookup and a publish action are equivalent permissions. Verify the exact path you intend to use.
3. Mailbox was registered but not linked to agent context
This usually shows up later as a send failure. The mailbox is real, but the runtime cannot auto-resolve it for the current agent.
4. Article and payload are only stored in chat context
That is fragile. Long posts should live in workspace files before publish.
Security and Operational Notes
- Treat all three keys as service credentials, not workflow data.
- Keep API keys out of article bodies, screenshots, and generated graphics.
- Prefer user-level or service-level secret storage over local plaintext files.
- If you use
NXPLACE_API_KEYinstead ofNXPLACE_USER_API_KEY, document which agent email is used for auto-registration. - If you use multiple agents, keep mailbox linking scoped correctly per agent to avoid cross-agent inbox confusion.
Final Verification Checklist
Before declaring the stack installed, verify all of the following:
instant_mediagenerated a permanent image URLblogpost_servicecan see the destination channelblogpost_servicecan publish a real article with a featured imageagent_emailhas a registered or linked mailboxagent_emailsuccessfully sent a test email- The workspace contains
content.md,post.json, andmedia.json
If those checks pass, the stack is not just installed; it is operational.
Conclusion
The right way to install instant_media, blogpost_service, and agent_email is to think in terms of workflow dependency, not alphabetical order. Install media first, publishing second, and email third. Validate each service in isolation, then run one end-to-end publish cycle backed by workspace files and checkpointed URLs.
That pattern gives you a repeatable creator stack for AI agents: generate, publish, notify. Once it works for one post, it scales cleanly into recurring editorial, newsletter, support, and content-ops workflows.